


Is your website feeling a bit slow? Using up more data? Often, 'cookies' are to blame. They're useful, but too many attached to your site can drag it down.
Good news: There's a simple fix. Using cookie-free domains can speed things up. If you're using WordPress, this guide's for you.
Let's understand how domains and cookies work together – both the good and bad.
How To Use Cookie-Free Domains
Create a Separate, Cookie-Free Domain
With this method, you’ll create a separate domain for hosting your website’s static components, such as images and CSS.
While you can register an entirely separate domain name, it’s usually easier and more cost-effective to create a subdomain of your existing domain name. Most cookie-free domains simply use a static prefix (e.g., “static.yourdomain.com”) as their subdomain.
Note that this will only work if the “www” version of your domain (e.g., “yourdomain.com”) is the root domain in your website’s root file.
To make the subdomain cookieless, you’d normally have to find and edit your .htaccess file directly using special code. However, as we’ll see later, it’s much easier to simply reconfigure your WordPress site or use a plugin.
However you configure your cookie-free subdomain, you can upload static components, such as your CSS components, images, text, and JavaScript.
Use a Content Delivery Network (CDN)
Using a content delivery network or CDN is an extremely convenient way to use cookie-free domains.
Here, rather than having to create separate subdomains and edit configuration files, you can simply tell your CDN to ignore and strip cookies from the response headers of your static components. That may sound a bit complicated, but it’s actually a simple feature in many CDNs.
Note that not every CDN provides this functionality. As a result, it’s generally better to change your website’s configuration unless you’re already using a CDN that allows you to disable cookies.
Reconfigure Your WordPress Site
If you’re using WordPress, you’re in luck: All it takes to designate a cookie-free domain is to update a couple of lines in your wp-config.php file. Skip ahead to the next section (Configuring WordPress to Use Cookie-Free Domains) for complete instructions.
Use a WordPress Plugin
Another easy WordPress option is to use a plugin for creating static versions of WordPress websites.
One popular plugin for doing this is WP2Static (literally “WordPress-to-Static”). After installing the plugin, simply open it in your WordPress dashboard and configure the settings to export your website to a static version:

WP2Static
Configuring WordPress to Use Cookie-Free Domains
As mentioned above, WordPress offers an easy way to implement cookie-free domains. The process boils down to a few simple steps:
Adding an alternate subdomain and associated DNS
Telling WordPress which domain will serve up static assets
Updating existing WordPress database records to reflect this new address
Kinsta customers can use the MyKinsta dashboard to accomplish some of these tasks. Many other WordPress users will be able to do the same in cPanel.
We’ll cover both below.
Using MyKinsta To Set up a Cookie-Free Domain
Kinsta customers can associate subdomains (or completely different domains) with a WordPress instance within the MyKinsta dashboard. Many customers will also use MyKinsta’s tools to configure DNS for those domains.
In this example, we’ll create a cookie-free domain at static.example.com for our website already up and running at example.com.
Step 1. Create a Subdomain in MyKinsta
If you initially established your WordPress site at Kinsta using the wildcard option with its domain name (like: *.example.com), you are already set to support any subdomain name. If not, you can add the new domain for cookie-free content like this:
Select WordPress Sites on the left-hand menu.
Click on the name of your WordPress site.
Select Domains on the left-hand menu.
Click the Add Domain button.
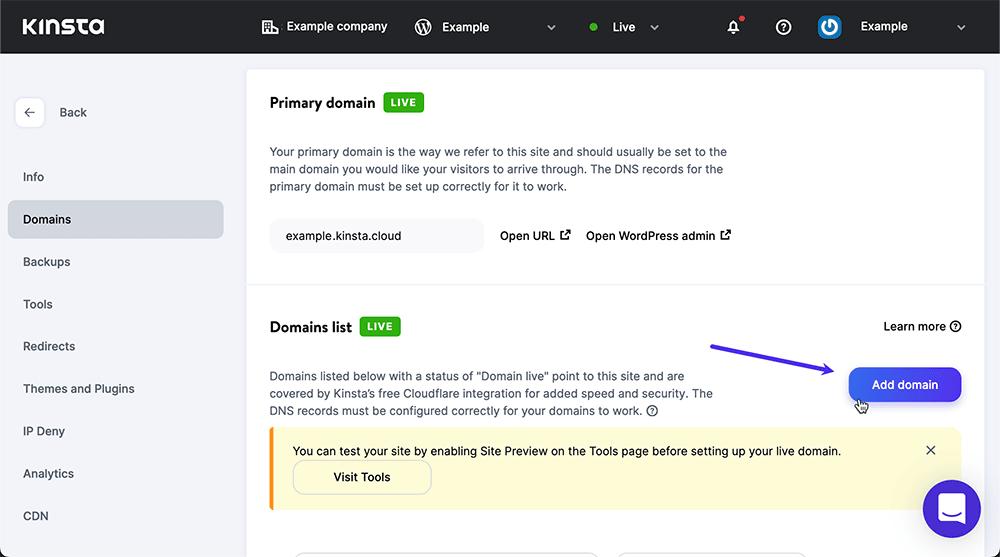
Adding a subdomain within MyKinsta.
In the following dialog:
Type the name of your cookie-free domain.
Click the Add Domain button.
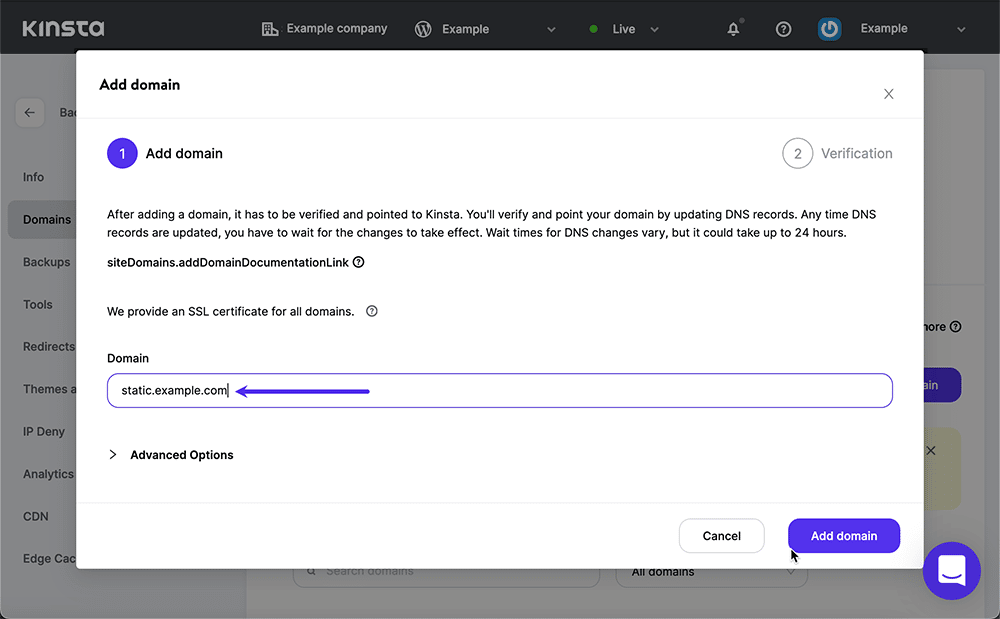
Specifying the new subdomain within MyKinsta.
Next, your new static domain will need a DNS record pointing to your existing website. If you manage DNS for your domains through a third-party provider, you will use their tools to do that. If your DNS is provided by us, configure your new domain in MyKinsta like this:
Select DNS on the left-hand menu of the MyKinsta home page.
On the DNS Management page, scroll down to the DNS Records block and click the Add DNS Record button.
We recommend adding your new subdomain to DNS as a CNAME record, allowing you to rely on just the second-level domain name for associations with IP addresses. Below, we are adding a CNAME record for static that points to example.com:
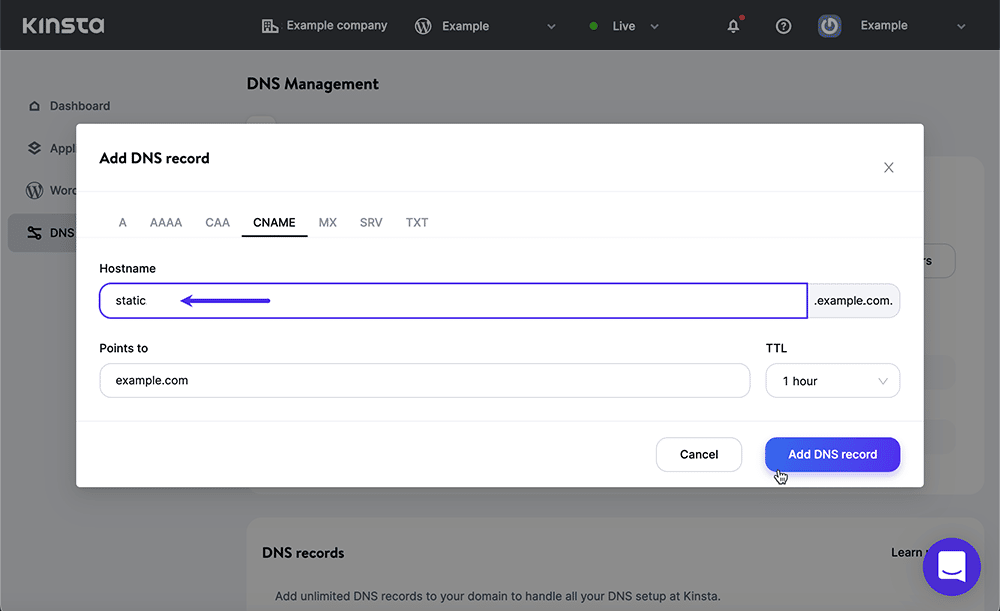
Creating a CNAME record in MyKinsta DNS management.
Step 2. Disable Cookies on Your Static Subdomain
Now we’ll edit your WordPress site’s wp-config.php file so that assets within the wp-content folder are served up from the “static” domain and cookies are delivered only via the “www” address.
Most Kinsta customers will use an FTP/SFTP client to login to their WordPress site and download wp-config.php to their desktop for editing:

Downloading the wp-config.php file to the desktop.
Use a text editor to add the following lines to the wp-config.php file (replacing the example domains with your own own):
define("WP_CONTENT_URL", "https://static.example.com/wp-content");
define("COOKIE_DOMAIN", "www.example.com");
After saving the file, upload it to your WordPress site, replacing the previous version.
Step 3. Redirect Existing Assets to the Subdomain
The steps above will allow cookies to be handed out when browsers load content like pages and blog posts from the “www” address, but will cause content like media uploads and assets like JavaScript, CSS and fonts within themes to be associated with the “static” domain.
However, your website may already have content that contains links to those assets at the “www” address. You can clean that up with a little search-and-replace in the WordPress database itself.
Always back up your WordPress site before working in the database. After that is done:
Select WordPress Sites on the left-hand menu of the MyKinsta dashboard.
Click on the name of your WordPress site.
Select Domains on the left-hand menu.
On the Site Information page, scroll down to the Database Access block. (You can copy database username and password information here if needed.)
Click the Open phpMyAdmin link.
Login to your WordPress database.
Click the SQL tab.
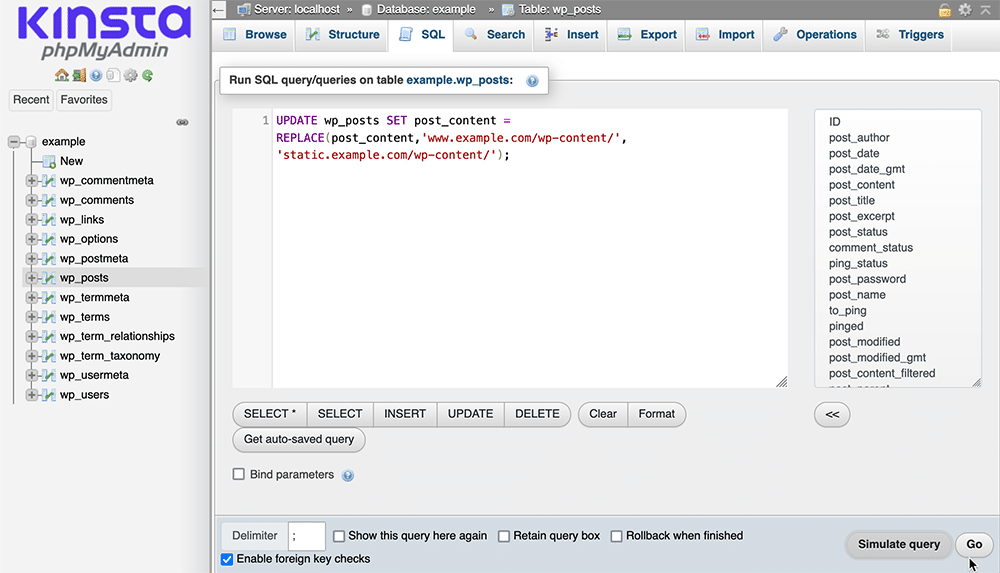
Running an SQL query to update asset links in WordPress content.
Run the following command to be sure that any asset links within your existing posts are directed to your cookie-free subdomain (again, being sure to replace the domains with your own):
UPDATE wp_posts SET post_content = REPLACE(post_content, 'www.example.com/wp-content/', ' static.example.com/wp-content/')
You’ve now successfully configured a cookie-free domain in WordPress with the help of MyKinsta. Use this domain to host any static content for which you don’t want to send WordPress cookies and use your regular domain for everything else.
Using cPanel To Set up a Cookie-Free Domain
Here are the steps to accomplish what we did above in MyKinsta using cPanel or one of the popular cPanel alternatives.
Step 1. Create a Subdomain in cPanel
Navigate to the Domains section of the cPanel main page. In the Subdomains tool, simply create a subdomain connected to the top-level domain of your current WordPress site.
These settings can be seen below to create the subdomain static.example.com.

Creating a subdomain in cPanel
Step 2. Configure the Subdomain as Static in cPanel
With your new static subdomain ready to go, it’s time to make it live up to its name by making it serve static content in WordPress.
We’ll do this by editing your WordPress site’s wp-config.php file. The easiest way to access this file is in cPanel’s File Manager tool.
In File Manager, navigate to your website’s public_html folder and select wp-config.php (1). Then, select the Edit option (2) to edit the file.
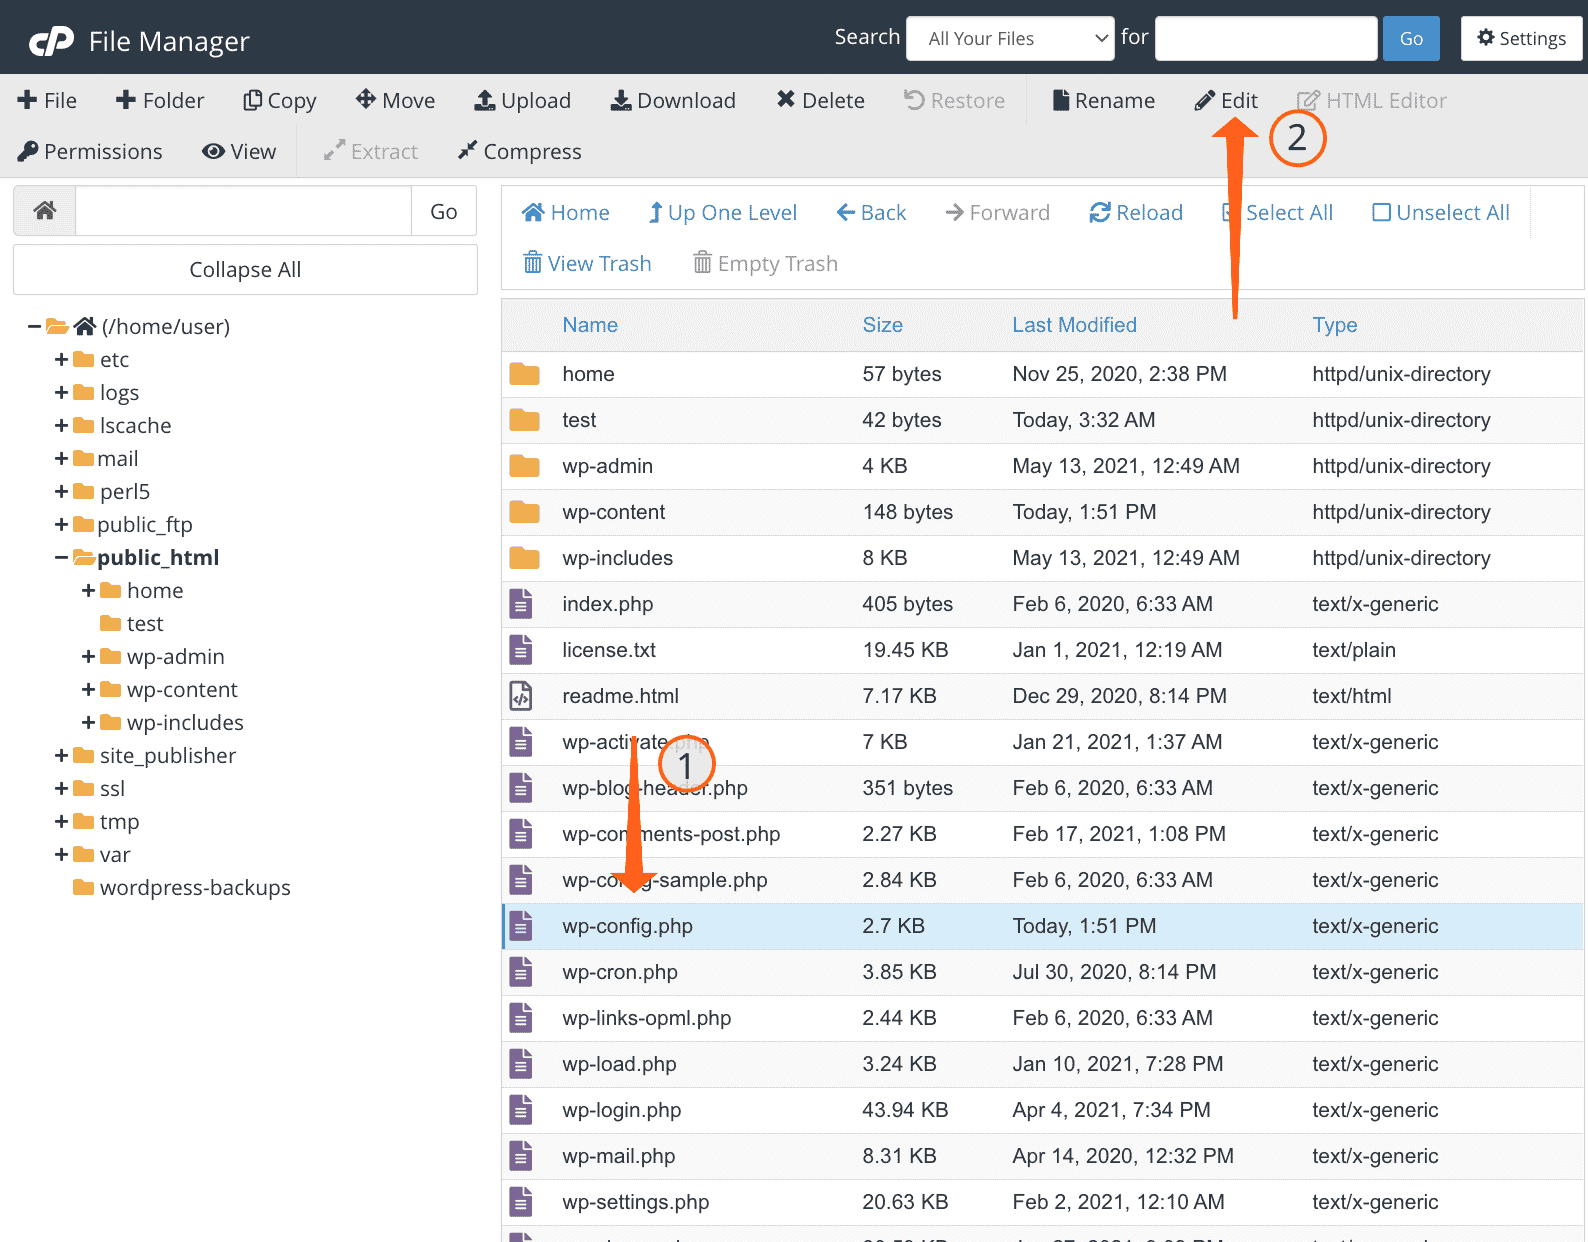
Locate the wp-config.php file
In the wp-config.php file, simply add the following lines (being sure to replace the domains with your own!):
define("WP_CONTENT_URL", "https://static.example.com/wp-content");
define("COOKIE_DOMAIN", "www.example.com");
Click “Save Changes.”
Step 3. Redirect Existing Posts to the Subdomain
Finally, you’ll need to redirect your existing posts to the new static subdomain. But first, be sure to back up your WordPress site just in case it doesn’t function properly after.
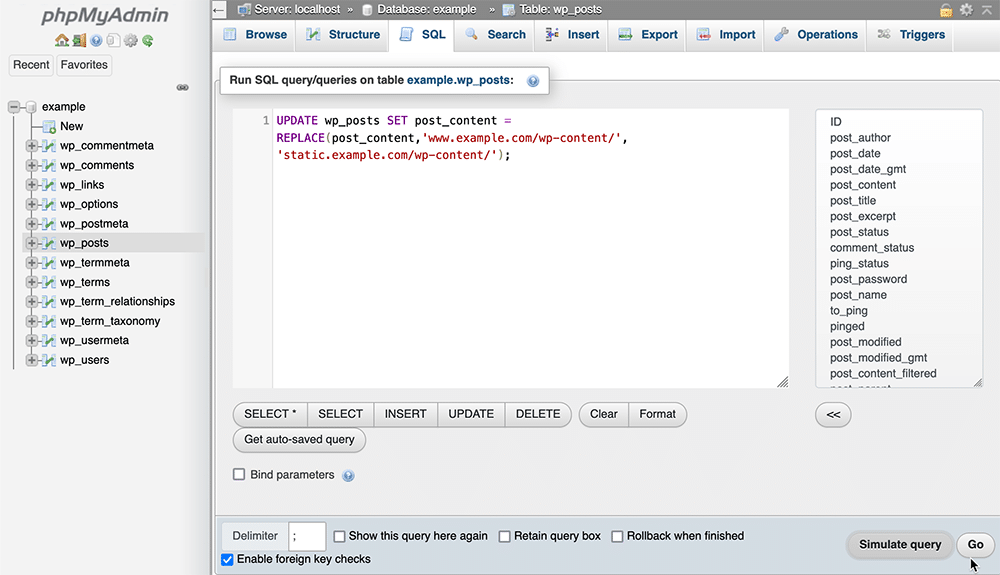
In the Database section of cPanel, open the PhpMySQL tool. Select your site’s database and then its _posts table.
Click the SQL tab of the _posts table. Run the following command to verify that your post URLs are directed to your cookie-free subdomain (again, being sure to replace the domains with your own):
UPDATE wp_posts SET post_content = REPLACE(post_content, 'www.example.com/wp-content/', ' static.example.com/wp-content/')
Redirecting existing posts to the new static subdomain
And that’s it! You’ve now set up a cookie-free domain in WordPress with the help of cPanel. Use the cookie-free domain for static content like images, CSS, JavaScript, and fonts, while allowing cookies on your site’s primary domain.
Setting up cookie-free domains in WordPress is beneficial. However, only a managed WordPress host like Kinsta can take full advantage of these benefits.
With convenient tools for removing set-cookie headers and direct database access to redirect posts to a static subdomain, it’s never been easier to use cookie-free domains. Kinsta’s APM tools and other performance-monitoring features can also help you track the results.